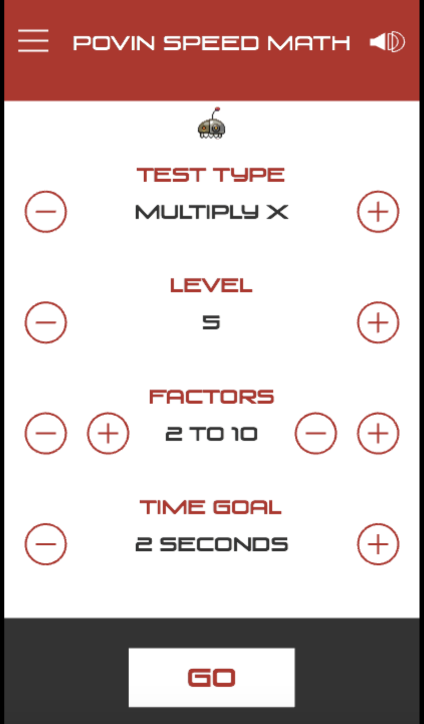
I made a new button by extending the Phaser 3 Container class. It uses a configuration object that passes two values to the constructor.
scene: and style:
You can see how they are accessed with config.scene and config.style
// Button Class
class MenuButton extends Phaser.GameObjects.Container {
    constructor(config) {
        super(config.scene, 0, 0);
            var b1 = config.scene.add.line(0, 0, 0, 0, 30, 0);
            var b2 = config.scene.add.line(0, 0, 0, 10, 30, 10);
            var b3 = config.scene.add.line(0, 0, 0, 20, 30, 20);
            b1.setStrokeStyle(1, config.style);
            b2.setStrokeStyle(1, config.style);
            b3.setStrokeStyle(1, config.style);

            this.add([b1, b2, b3]);
            this.setSize(40, 40);
            this.setInteractive();
            config.scene.add.existing(this);
    }
};
Then creating new shapes, a new feature in Phaser 3.13 (released September 2018) and placing them in the container. Three horizontal lines are added, and then styled based on the config.style value.
this.add([b1,b2,b3]) adds the 3 lines to the container.
You have to set the size of the container before you can set it interactive.
this.setInteractive() turns this game object into a clickable object.
The last statement adds this new container object to the current scene. This is a very important step, otherwise it will not show up on the screen.
I like this instead of a sprite so that it can be modified programmatically instead of having to create different colored sprites.
You can then use it in your Create statement like this.
// place in the create section
this.buttonHome = new MenuButton({
            scene: this,
            style: style.headerGraphicH,
  });

  this.buttonHome.on('pointerdown', function () {
            Povin.actionOnClickHome({
                target: this,
                ctx: game.ctx
            });
  });
  this.buttonHome.nextState = 'Scores';
  Povin.place(this.buttonHome, 0.07, 0.055);
See where the scene: and style: parameters are passed as an {object}. The this passed to the scene is the current scene where you are placing this button. The style is just a hex ‘0xff0000’ value to set the color of the 3 horizontal lines. This must not be the standard CSS hex value of ‘#ff0000’.
The next statement listens for a mouse or touch event ‘pointerdown’ on the container ‘buttonHome’, then executes the Povin.actionOnClickHome function in the Povin helper class. It is passed another config object with target: (this container object ‘buttonHome’) and the current scene context.
There is also another value passed in the buttonHome object nextState value which tells the game the next scene to start. In this case the ‘Scores’ scene.
I use another Povin helper function to place the home button on the screen. In stead of using absolute pixel positions I use a percentage of screen location. The first value is the x percent (in this case .07 percent from the left margin) and the y percent (in this case .055 percent from the top margin). This button sits tightly in the top left corner of the screen.
Here is the Povin.actionOnClickHome code.
// helper code to goto the next scene on click
actionOnClickHome: function (config) {
   config.ctx.scene.start(config.target.nextState);
},
You can see where the config.ctx is used to get the scene context and then call the scene.start method to start the next scene. You can also see the config.target.nextState value that was set on the buttonHome object.
You can see the home button 3 horizontal lines in the top left corner of this image. You can also see other buttons I created. A weird speaker button in the top right (I should use a sprite here) and the round plus and minus buttons. The text Go button at the bottom is created in the same way, by using a rectangle Shape and a Text object.

There you go, a simple new button created with Phaser 3 shapes. I read that the container object is not very efficient if it contains many objects so I wouldn’t create anything too complex, but for simple buttons it works great!
You can see all the buttons in action, and play a frustrating game of Speed Math at: Povin Speed Math